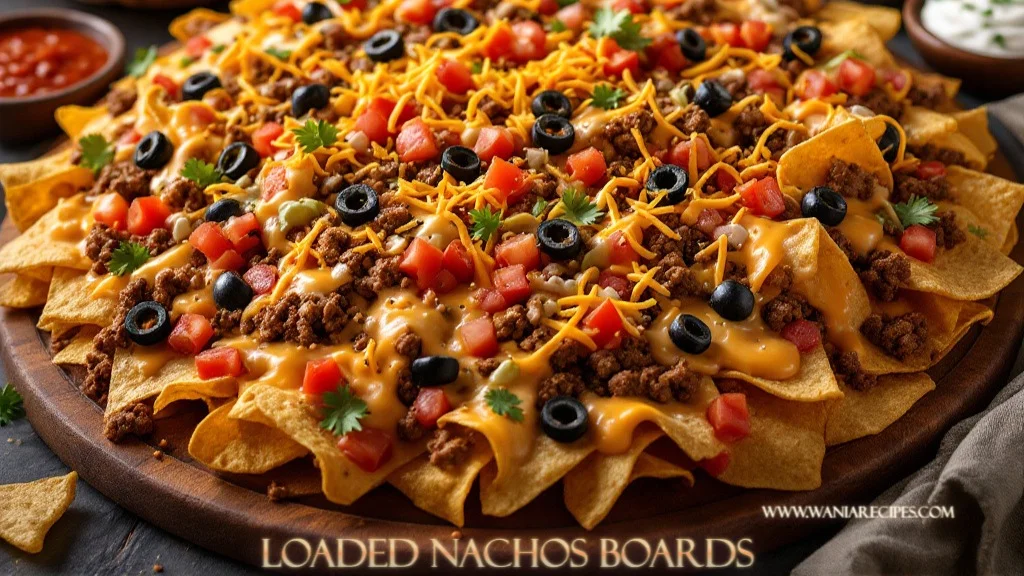
Imagine a big, beautiful board piled high with crispy tortilla chips, melted cheese stretching with every pull, sizzling toppings, and fresh, zesty garnishes scattered on top. Loaded Nachos Boards aren’t just food—they’re an experience. Whether you’re hosting friends, planning game night, or craving a fun, shareable meal, this recipe turns simple ingredients into a bold, mouth-watering centerpiece that everyone gathers around. One look, one bite, and you’ll know this is comfort food done right.
Table of Contents
Why You’ll Love This Recipe
- Perfect for sharing: Ideal for parties, family nights, or casual get-togethers
- Customizable: Easily adapt toppings for meat lovers, vegetarians, or spice fans
- Big flavors, minimal effort: Simple steps with restaurant-style results
- Visually stunning: A show-stopping board that looks as good as it tastes
- Crunchy, cheesy, and fresh: The ultimate balance of textures and flavors
Ingredients
Here’s everything you need to build the ultimate loaded nachos board. Feel free to mix and match based on your taste.
- Tortilla chips (thick, sturdy style)
- Shredded cheddar cheese
- Shredded Monterey Jack or mozzarella cheese
- Cooked ground beef or shredded chicken (seasoned)
- Black beans, rinsed and drained
- Corn kernels (fresh, canned, or roasted)
- Jalapeños, sliced
- Red onion, finely chopped
- Fresh tomatoes or pico de gallo
- Sour cream
- Guacamole or sliced avocado
- Fresh cilantro, chopped
- Olive oil
- Salt and black pepper
- Optional: olives, hot sauce, salsa, lime wedges
Step-by-Step Instructions
Step 1: Prepare the Protein
Heat a skillet over medium heat and add a splash of olive oil. Cook your ground beef or chicken with salt, pepper, and your favorite spices until sizzling and aromatic. The smell alone will get everyone excited.
Step 2: Preheat the Oven
Set your oven to 375°F (190°C). This temperature melts the cheese perfectly without burning the chips.
Step 3: Build the First Layer
Spread a generous layer of tortilla chips across a large baking tray or oven-safe board. Sprinkle cheese evenly, making sure every chip gets a little love.
Step 4: Add the Toppings
Scatter cooked meat, black beans, corn, jalapeños, and red onions over the chips. Add another layer of cheese for extra gooey goodness.
Step 5: Bake Until Melty
Bake for 10–15 minutes, or until the cheese is bubbling and lightly golden. You’ll hear the sizzle and smell the rich, cheesy aroma filling your kitchen.
Step 6: Finish Fresh
Remove from the oven and immediately top with tomatoes, cilantro, sour cream, and guacamole. The contrast of hot, melted cheese and cool, creamy toppings is irresistible.
Tips & Variations
- Extra crispy chips: Warm chips in the oven for 3–5 minutes before adding toppings
- Vegetarian option: Skip the meat and add sautéed mushrooms or bell peppers
- Spicy kick: Drizzle hot sauce or add chipotle peppers
- Cheese blend tip: Mixing cheeses gives better melt and deeper flavor
- Board presentation: Use parchment paper on a wooden board for easy serving
What to Serve With It
Loaded Nachos Boards pair beautifully with:
- Fresh salsa or mango salsa
- Chilled lemonade or iced tea
- Mocktails or sparkling drinks
- A crisp side salad for balance
Storage Tips
Nachos are best enjoyed fresh, but leftovers can be stored:
- Remove cold toppings before storing
- Store in an airtight container in the fridge for up to 2 days
- Reheat in the oven at 350°F to restore crunch (avoid microwaving if possible)
Nutrition & Calories
Approximate values per serving (based on standard toppings):
| Nutrient | Amount |
|---|---|
| Calories | 420 kcal |
| Carbohydrates | 38 g |
| Protein | 18 g |
| Fat | 22 g |
Values may vary depending on toppings and portion size.
Final Thoughts
Loaded Nachos Boards are everything you want in a crowd-pleasing recipe—crispy, cheesy, colorful, and bursting with bold flavors. You get crunch, creaminess, heat, and freshness all in one bite. Whether you’re serving guests or treating yourself, this board turns ordinary ingredients into an unforgettable, share-worthy meal you’ll want to make again and again.
For More Recipes Visit : www.waniarecipes.com