
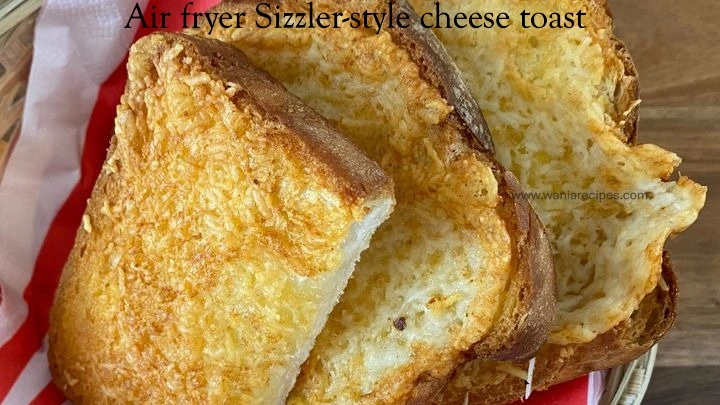
That first bite says it all—crispy edges, a soft buttery center, and a bubbling layer of golden cheese that stretches ever so slightly as you pull it apart. If you’ve ever craved the famous Sizzler-style cheese toast, you’re about to fall in love with how easy it is to recreate at home. Using your air fryer, you get that irresistible crunch and rich, garlicky aroma in minutes, without turning on the oven. Once you smell the butter melting and the cheese sizzling, you’ll know this recipe is about to become a favorite.
Table of Contents
Why You’ll Love This Recipe
- You get classic Sizzler-style flavor at home with simple ingredients
- The air fryer makes it faster and crispier than the oven
- Perfectly golden outside, soft and buttery inside
- Ideal as a side dish, snack, or party appetizer
- Customizable with different cheeses and seasonings
- Minimal prep, minimal cleanup, maximum comfort food joy
Ingredients
- 4 slices thick white bread or Texas toast
- 4 tablespoons softened butter
- ½ cup shredded Colby-Jack cheese (or cheddar blend)
- 2 tablespoons grated Parmesan cheese
- 1 teaspoon garlic powder
- ½ teaspoon dried parsley (optional, for color and flavor)
- Pinch of salt (optional, to enhance the cheese flavor)
Step-by-Step Instructions
Step 1: Prepare the Bread
Lay your bread slices flat on a cutting board. Spread a generous, even layer of softened butter over one side of each slice. Make sure the butter reaches all the way to the edges—this is what gives you that rich flavor and golden crispness.
Step 2: Mix the Cheese Topping
In a small bowl, combine the shredded Colby-Jack cheese, Parmesan, garlic powder, dried parsley, and a tiny pinch of salt if needed. The mix should smell savory and cheesy, with a gentle garlic aroma.
Step 3: Top the Toast
Sprinkle the cheese mixture evenly over the buttered side of each bread slice. Press lightly so the cheese sticks and melts beautifully instead of sliding off.
Step 4: Air Fry to Perfection
Preheat your air fryer to 180°C (350°F). Place the bread slices cheese-side up in the air fryer basket, making sure they’re not overlapping. Air fry for 5–7 minutes, or until the cheese is melted, bubbly, and lightly golden, and the edges of the bread are crisp.
Step 5: Serve Hot and Melty
Carefully remove the cheese toast from the air fryer. Let it cool for about 30 seconds, then slice and serve while the cheese is still gooey and irresistible.
Tips & Variations
- For extra crunch, air fry for an additional 1 minute, watching closely
- Swap Colby-Jack with mozzarella for extra stretch or sharp cheddar for bold flavor
- Add a pinch of chili flakes if you like a little heat
- Use sourdough or brioche for a gourmet twist
- For a richer taste, mix a teaspoon of mayonnaise into the butter before spreading
What to Serve With It
- Grilled chicken, steak, or burgers
- Creamy tomato soup or vegetable soup
- Fresh green salad for balance
- Pasta dishes like lasagna or baked ziti
- As a snack with marinara or garlic dip
Storage Tips
Cheese toast is best enjoyed fresh, but if you have leftovers, let them cool completely and store them in an airtight container in the refrigerator for up to 2 days. Reheat in the air fryer at 160°C (320°F) for 2–3 minutes to restore crispness. Avoid microwaving, as it can make the bread chewy.
Nutrition & Calories
Approximate values per serving (1 slice):
| Nutrient | Amount |
|---|---|
| Calories | 220 kcal |
| Carbohydrates | 18 g |
| Protein | 7 g |
| Fat | 14 g |
Conclusion
This air fryer Sizzler-style cheese toast brings comfort, crunch, and cheesy goodness together in the easiest way possible. From the buttery aroma to the crispy bite and melty topping, every slice feels indulgent and satisfying. Whether you serve it alongside dinner or enjoy it as a quick snack, this recipe proves that simple ingredients can create unforgettable flavor—right in your own kitchen.
For More Recipes Visit : www.waniarecipes.com